Java Collections In Depth
You've already seen how we use lambda expressions to make working with collections easier. In this tutorial, we'll look at Java collections in depth.
We'll introduce Java collections by explaining what they are, the collection hierarchy, and general benefits of using Java collections. We'll then examine each Collection interface including in depth explanations and examples for each.
What are collections in Java?
A collection is an object that groups elements together into a single unit. Collections make it easy to group similar elements together and perform iterations and aggregations on groups of elements.
A basic example of a collection in Java:
import java.util.*;
public class MainClass {
    public static void main(String[] args) {
        List<String> myList = new ArrayList<String>();

        myList.add("hello");
        myList.add("world");

        for (String item : myList)
            System.out.println(item);
    }
}
If you run this code, you'll get the following output:
hello
world
This example demonstrates how we use a collection to iterate over a list of strings. We've created an ArrayList which implements the List interface.
Notice how we use for(String item : myList) to iterate over our collection. In this example, we simply print out each item via System.out.println(item).
The Collections Framework
In the last example, we used the List interface provided by the Collections framework. It turns out that this List interface is one of several core collection interfaces. This hierarchy of generic interfaces is the heart and soul of the Java Collections framework...
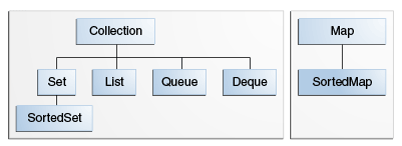
Notice how Set, List, Queue, and Deque all extend the Collection interface. We'll be looking at each one of these in more detail.
The Collection interface
The Collection interface represents a group of elements. It provides generic functionality for converting collections of different types, returning size (or number of elements), modifying its members, and more.
The Collection interface is the root of the collection hierarchy. With the exception of the Map class, every collection we'll look at in this tutorial extends the Collection interface.
Basic Functionality of Java Collections:
import java.util.*;
public class MainClass {
    public static void main(String[] args) {
        Collection<String> hashStrings = new HashSet<String>();
        hashStrings.add("hello");
        hashStrings.add("goodbye");

        List<String> arrayStrings = new ArrayList<String>(hashStrings);
        //easily convert different types of collections

        arrayStrings.size();
        //returns 2

        arrayStrings.isEmpty();
        //returns false

        arrayStrings.contains("hello");
        //returns true

        arrayStrings.contains("world");
        //returns false

        arrayStrings.add("another string");
        //adds element to collection

        arrayStrings.removeAll(hashStrings);

        for(String item :  arrayStrings)
            System.out.println(item);
        //prints 'another string'

    }
}
Look closely at this example. It demonstrates a lot of the common functionality included with the Collection interface.
Collections are generic meaning they parameterize data types. This makes it easy to convert between different types of collections whose elements have the same data type. Notice how we first define a HashSet (an implementation of the Set interface) collection hashStrings. We then create a separate ArrayList collection arrayStrings from the original hashStrings collection.
This is possible because of the Collection's conversion constructor. Since hashStrings and arrayStrings both specify <String> we can create different types of collections from the same set of elements.
PLEASE NOTE: This does not mean we can convert the data type of the collection's elements themselves. For example, we would not be able to create an ArrayList of <Integer> using the original hashStrings collection because it specifies a <String> data type.
Also notice how we add another element to our collection via arrayStrings.add("another string"). We then remove all of the original elements copied from hashStrings via arrayStrings.removeAll(hashStrings).
This leaves us with just the element we added via the add() method.
Iterating over collections
There are several ways to iterate over a collection in Java...
1) Use for-each
We've already seen how for-each can be used to iterate over a collection:
Using for-each to loop through a collection:
import java.util.*;
public class MainClass {
    public static void main(String[] args) {
        List<String> arrayStrings = new ArrayList<String>();
        arrayStrings.add("hello");
        arrayStrings.add("goodbye");
        for(String item : arrayStrings)
            System.out.println(item);
    }
}
If you run this code, you'll see:
hello
goodbye
2) Use an Iterator
The Collection interface extends the Iterable interface. This makes it easy to create an Iterator for any given collection:
Using an iterator to loop through a collection:
import java.util.*;
public class MainClass {
    public static void main(String[] args) {
        List<String> arrayStrings = new ArrayList<String>();
        arrayStrings.add("hello");
        arrayStrings.add("goodbye");
        for (Iterator<String> it = arrayStrings.iterator(); it.hasNext(); )
            if (it.next() != "hello")
                it.remove();
    }
}
Notice how we create an Iterator by calling the iterator() method on our arrayStrings collection. While the hasNext() method returns true if the iteration has more elements, the next() method returns the next element in the iteration. The remove() method removes the specified element from the collection.
When should I use an Iterator instead of for-each?
Use an iterator when you want to remove elements from the collection. Iterators are good for filtering data and iterating over multiple collections in parallel. This is because for-each doesn't support the removal of elements as it hides the iterator used to implement its functionality.
3) Use streams
Oracle recommends using streams to iterate over collections in JDK 8 or later. Such iterations often leverage lambda expressions, which you can read more about here.
Using streams to loop through a collection:
import java.util.*;
public class MainClass {
    public static void main(String[] args) {
        List<String> arrayStrings = new ArrayList<String>();
        arrayStrings.add("hello");
        arrayStrings.add("goodbye");
        arrayStrings.stream()
        .filter(s -> s != "goodbye")
        .forEach(s -> System.out.println(s));
    }
}
Notice how we call stream() to obtain a stream of our arrayStrings collection. We can then call aggregate operations like filter() and forEach() with lambda expressions to iterate over the collection in a more expressive way.
Remember that the Collection interface is at the root of the collections hierarchy. With the exception of Map, all of the interfaces we'll discuss next extend the Collection interface.
Let's take a closer look at the other interfaces that make up the Collections framework...
The List Interface
A List is an ordered Collection. A List can contain duplicate elements (unlike some other collections we will look at).
Remember that List extends the generic Collection interface. It can do all the same things a regular Collection can do with some added functionality, including:
1) Positional access
A list can manipulate elements based on their numerical position:
Examples of positional access with lists
import java.util.*;
public class MainClass {
    public static void main(String[] args) {
        List<String> arrayStrings = new ArrayList<String>();

        arrayStrings.add("hello");
        arrayStrings.add("goodbye");
        //regular add method shared by all collection interfaces

        arrayStrings.add(1, "how are you?");
        //inserts element at position 1

        arrayStrings.remove(0);
        //removes element at position 0

        arrayStrings.stream()
        .forEach(s -> System.out.println(s));
    }
}
Run this code and you will get the following output:
how are you?
goodbye
Notice how we can optionally specify a position as the first argument to arrayStrings.add(). This allows us to add an element at a specified index.
We can do the same thing with remove(). Notice how we pass in an index argument 0 rather than an Object.
Positional access applies to other methods like set(), get(), addAll(), etc.
2) Search
A list can search for a specified object and returns numerical position:
Examples of searching with lists
import java.util.*;
public class MainClass {
    public static void main(String[] args) {
        List<String> arrayStrings = new ArrayList<String>();
        arrayStrings.add("hello");
        arrayStrings.add("how are you");
        arrayStrings.add("goodbye");
        arrayStrings.add("hello");

        arrayStrings.indexOf("hello");
        //returns 0

        arrayStrings.lastIndexOf("hello");
        //returns 3
    }
}
Notice how we've added hello twice to our arrayStrings list. While indexOf() returns the first index that matches the argument, indexOfLast() returns the last index that matches the argument.
3) Iteration
We already saw how the Collection interface provides an iterator() method. The List interface provides an additional ListIterator which allows you to:
- traverse the list in either direction
- modify the list during iteration
- obtain current position of the iterator
Example of using the ListIterator:
import java.util.*;
public class MainClass {
    public static void main(String[] args) {
        List<Character> arrayChars = new ArrayList<Character>();
        arrayChars.add('a');
        arrayChars.add('b');
        arrayChars.add('c');

        ListIterator<Character> litr = arrayChars.listIterator();

        while(litr.hasNext()) {
            System.out.println(litr.next());;
        }

        while(litr.hasPrevious()) {
            System.out.println(litr.previous());;
            litr.set('a');
        }

        arrayChars.stream()
        .forEach(System.out::println);
    }
}
Run this code and you will get the following output:
a
b
c
c
b
a
a
a
a
Notice how we create a new instance of ListIterator from calling arrayChars.listIterator().
In addition to hasNext() and next(), the ListIterator also has access to hasPrevious() and previous() methods. These work in the same manner as hasNext() and next(), just in the opposite direction.
Also notice how we are able to modify the list during the iteration. By calling litr.set('a'), we modify every element by replacing it with 'a'.
4) Range-View Operations
The List interface also defines range-view operations:
Example of using the subList() method:
import java.util.*;
public class MainClass {
    public static void main(String[] args) {
        List<Character> arrayChars = new ArrayList<Character>();
        arrayChars.add('a');
        arrayChars.add('b');
        arrayChars.add('c');

        arrayChars.subList(0, 1).clear();
        //easily operate on sublist only

        arrayChars.stream()
        .forEach(System.out::println);
    }
}
If you run this code, the output will be:
b
c
Notice how we use the subList() method to specify a sub range of our arrayChars list. Please note that the first argument specified in the range is inclusive while the last is exclusive. This is why the first element 'a' is cleared, but not 'b'.
List Implementations
There are several implementations of lists worth discussing:
1) ArrayList
All of the examples in this tutorial have used the ArrayList implementation of the List interface. This is because the ArrayList is the most commonly used and is usually the best option.
An ArrayList is implemented as a resizable array.
2) LinkedList
A LinkedList is implemented as a double linked list. Every element in a LinkedList is wrapped in a node object. This makes a LinkedList better for things like add() and remove() but worse for get() and set()
3) Vector
The Vector class implements a growable array of objects. Unlike an ArrayList, a Vector is synchronized.
There are a few special-purpose List implementations (namely CopyOnWriteArrayList) however these are used less frequently. The ArrayList is the most commonly used implementation and is usually the best choice for your needs.
You can find more on these implementations at javatpoint. You can also find a good explanation of the differences between these implementations here.
The Set Interface
The Set interface can't contain duplicate elements. The only major difference between Set and Collection is the additional restrictions Set puts on duplicate elements.
Using Set to Find Duplicates
import java.util.*;
public class MainClass {
    public static void main(String[] args) {
        List<Character> myList = new ArrayList<Character>();
        Set<Character> singleEntries = new HashSet<Character>();
        Set<Character> dupEntries = new HashSet<Character>();

        myList.add('a');
        myList.add('b');
        myList.add('b');
        myList.add('c');
        myList.add('d');
        myList.add('d');

        for(char item : myList){
            if(!singleEntries.add(item))
                dupEntries.add(item);
        }

        singleEntries.removeAll(dupEntries);
        //destructive method

        System.out.println(singleEntries);
        //prints [a, c]

        System.out.println(dupEntries);
        //prints [b, d]
    }
}
In this example, we leverage the Set interface to return unique values of the ArrayList myList.
Notice how we iterate through each element in myList with for-each. Since a Set can only include unique values, we are able to separate unique values from duplicates with if(!singleEntries.add(item)).
We can then remove duplicate entries from our singleEntries HashSet with removeAll(). Note that this method is destructive.
Set Implementations
There are three general-purpose Set implementations that are commonly used:
1) HashSet
The HashSet is the most commonly used. It's faster than TreeSet but does not guarantee order. It's implemented using a hash table. The time complexity of basic methods like add(), remove() and contains() is O(1).
2) TreeSet
The TreeSet is implemented using a tree structure. The elements in a TreeSet are sorted. Basic methods for a TreeSet have a time complexity of O(log(n)).
A TreeSet does not preserve the insertion order of its elements and is not thread-safe. A TreeSet sorts it's elements in ascending order. For a more in depth read on TreeSet, check out this Baeldung article.
3) LinkedHashSet
A LinkedHashSet is between a HashSet and a TreeSet. It's implemented as a hash table but also has a linked list running through it. This allows LinkedHashSet to provide order insertion. The time complexity for basic operations is O(1).
With a LinkedHashSet, the order of the output is guaranteed.
When to use a HashSet vs TreeSet vs LinkedHashSet?
More often that not, you'll want to use HashSet. Consider using TreeSet if the value order matters. An example would be a set of names that you always want sorted in alphabetical order. Use LinkedHashSet when you want to preserve the order that elements were inserted but want similar performance to HashSet.
Most TreeSet operations have log-time complexity whereas HashSet and LinkedListSet operations have constant-time complexity. This makes HashSet the preferred implementation for most use cases.
The Queue Interface
The Queue interface is used to hold elements prior to processing. A Queue orders its elements in a FIFO (first-in-first-out) manner.
Example of a Queue implementation and its methods
import java.util.*;
public class MainClass {
    public static void main(String[] args) {
        Queue<Character> myQueue = new LinkedList<Character>();
        myQueue.add('a');
        myQueue.add('b');
        myQueue.add('c');
        myQueue.add('d');

        myQueue.add('e');
        //adds 'e' to end of myQueue

        myQueue.offer('f');
        //adds 'f' to end of myQueue

        myQueue.remove();
        //removes 'a'

        myQueue.poll();
        //remove 'b'

        myQueue.element();
        //returns 'b'

        myQueue.peek();
        //returns 'b'

        System.out.println(myQueue);
        //prints [c, d, e, f]
    }
}
Notice how we create a new Queue myQueue with a LinkedList. We can do this because LinkedList implements the Deque interface (an extension of the Queue interface).
There are six methods demonstrated in this example. You'll notice that add() and offer() both add an element to the end of the queue. The remove() and poll() methods both remove and return the first element in the queue. The element() and peek() method both return (but not remove) the first element in the queue.
So why have multiple methods doing the same thing? The answer is subtle and has to do with what's returned. While add(), remove(), and element() all throw exceptions, offer(), poll(), and peek() return false or null if they fail.
Queue Implementations
Remember that LinkedList implements the Queue interface so can be considered an implementation. The PriorityQueue is another general purpose implementation.
A PriorityQueue does not accept null elements. The ordering of a PriorityQueue is based on a priority heap size and elements are ordered according to their natural ordering.
When should I use a PriortyQueue over a LinkedList?
A LinkedList preserves insertion order. A PriorityQueue does not. Iteration order changes with a PriorityQueue. Use a PriorityQueue when you want to respect the natural ordering of elements in a Queue and insertion order does not matter.
Remember that these implementations are not thread safe. For more on synchronized Queues, check out the official documentation.
The Deque Interface
The Deque interface is a double-ended queue. This means you can insert and remove elements at both ends.
The Deque implements both the Stack and Queue interface. LinkedList implements the Deque interface.
Example of a Deque implementation and some of its methods
import java.util.*;
public class MainClass {
    public static void main(String[] args) {
        Deque<Character> myQueue = new LinkedList<Character>();
        myQueue.add('a');
        myQueue.add('b');
        myQueue.add('c');
        myQueue.add('d');

        myQueue.addFirst('e');
        //adds 'e' to start of myQueue

        myQueue.offerLast('f');
        //adds 'f' to end of myQueue

        myQueue.removeFirst();
        //removes 'e'

        myQueue.pollLast();
        //remove 'f'

        myQueue.getFirst();
        //returns 'a'

        myQueue.peekLast();
        //returns 'd'

        myQueue.removeFirstOccurrence('b');
        //removes first occurance of 'b'

        System.out.println(myQueue);
        //prints [a, c, d]
    }
}
Notice how these methods are very similar to the Queue methods. The major difference is the additional methods specifying either first or last. Since Deque is a double-ended queue, it supports methods for both direction. For example, while the example calls pollLast() there is also a corresponding pollFirst() method.
The Deque interface includes a removeFirstOccurrence() method. This simply removes the first occurrence of the specified object. If the object does not exist, the Deque instance remains unchanged. The removeLastOccurance() method works in a similar fashion...
For a complete list of Deque methods, check out the official documentation.
Deque Implementations
We've already seen how LinkedList implements the Deque interface. The ArrayDeque interface is another general-purpose implementation of Deque. The ArrayDeque is a resizable array implementation of the Deque interface.
When to use LinkedList vs ArrayDeque
LinkedList is generally more flexible than ArrayDeque. While ArrayDeque is faster for add and remove operations, LinkedList is better for removing the current element in an iteration.
LinkedList consumes more memory than ArrayDeque but implements optional List methods. Things like null elements are allowed with LinkedList but not ArrayQueue.
It's important to remember that the Deque interface does not support concurrent access from multiple threads. Check out the LinkedBlockingDeque class for a concurrent implementation of the Deque interface.
The Map Interface
A Map object maps keys to values. Every key in a Map must be unique and a key cannot map to more than one value.
Example of a Map implementation and some of its methods
import java.util.*;
public class MainClass {
    public static void main(String[] args) {
        Map<String, Integer> myMap = new HashMap<String, Integer>();
        myMap.put("Sam", 33);
        myMap.put("Erica", 49);
        myMap.put("Ted", 12);

        myMap.size();
        //returns 3

        myMap.get("Erica");
        //returns 49

        myMap.remove("Ted");
        //removes key/value pair from myMap

        myMap.isEmpty();
        //returns false

        myMap.containsKey("Erica");
        //returns true

        myMap.containsValue(33);
        //returns true
    }
}
Notice how we create a new Map instance by specifying Map<String, Integer>. Remember that a Map is a collection of key,pair values. <String, Integer> indicates the data type associated with the keys/values.
Notice how the put() adds a new key/value pair to the map. While remove() deletes a key/value pair for the specified key, containsKey() returns true/false based on the specified key's presence.
Iterating over Map objects
There are several ways to iterate over a Map object...
Example of iterating over a Map Object
import java.util.*;
public class MainClass {
    public static void main(String[] args) {
        Map<String, Integer> myMap = new HashMap<String, Integer>();
        myMap.put("Sam", 33);
        myMap.put("Erica", 49);
        myMap.put("Ted", 12);

        for(String key : myMap.keySet())
            System.out.println("Printing key " + key);

        for(Integer value : myMap.values())
            System.out.println("Printing value " + value);

        for(Map.Entry<String, Integer> e : myMap.entrySet())
            System.out.println(e.getKey() + ", " +  e.getValue());
    }
}
Run this code to get the following output:
Printing key Ted
Printing key Erica
Printing key Sam
Printing value 12
Printing value 49
Printing value 33
Ted, 12
Erica, 49
Sam, 33
This example demonstrates three different ways to iterate over a Map object. Notice how we can use the keySet() method to return an iterable set of the map's keys.
We can do the same thing with the map's values via the values() method.
We can also use the Entry interface along with the entrySet() method to iterate over each entry in the map object. Notice how we call getKey() and getValue() to retrieve the entry values.
Map Implementations
There are 3 general-purpose Map implementations that you will commonly see. These are similar to the Set implementations (HashSet, TreeSet, LinkedHashSet) and have similar appropriate use cases, etc.
1) HashMap
The HashMap is among the most commonly used Map implementations. Like a HashSet, it's the most efficient but does not guarantee order. The Map examples you've seen in this tutorial have all used the HashMap implementation.
2) TreeMap
Like TreeSet, the TreeMap sorts its entries in ascending order based on the key values. Use a TreeMap when you want elements stored in a sorted order based on key values.
3) LinkedHashMap
The LinkedHashMap is less efficient than HashMap but maintains insertion order (similar to LinkedHashSet). The LinkedHashMap has some extra functionality, including ordering elements based on access rather than insertion. Looking up a key moves that key/value pair to the end of the map.
LinkedHashMap also uses a removeEldestEntry() method which can be perfect for implementing a cache etc.
Other Map Implementations
There are other special-purpose Map implementations such as EnumMap, WeakHashMap, and IdentityHashMap. Be sure to check out the original documentation for more specifics on these implementations.
Object Ordering
If a collection's elements implement the Comparable interface, you can sort it with the static sort() method...
Example of sorting a collection with Collections.sort()
import java.util.*;
public class MainClass {
    public static void main(String[] args) {
        List<Integer> myList = new ArrayList<Integer>();
        myList.add(3);
        myList.add(1);

        Collections.sort(myList);
        //sorts myList in ascending order

        System.out.println(myList);
        //prints [1, 3]
    }
}
This works for our ArrayList myList because it's elements are of the Integer type. More specifically, the Integer class implements the Comparable interface.
The Comparable interface is a functional interface that implements a single compareTo() method. This method returns a positive integer , negative integer, or 0 based on the equality of two objects. You can implement your own custom comparables by extending the Comparable interface and implementing the compareTo() method yourself.
The SortedSet and SortedMap Interface
A TreeSet is an implementation of the SortedSet interface. A TreeMap is an implementation of the SortedMap interface. Remember that both TreeSet and TreeMap sort elements in their ascending natural order. This is because of these interfaces, which provide additional functionality for returning sorted values like:
- Range view - allows arbitrary range operations on the sorted set/map
- Endpoints - returns first or last elements in set/map
- Comparator access - returns the Comparator used sort the set/map
Example of SortedSet implemented as a TreeSet
import java.util.*;
public class MainClass {
    public static void main(String[] args) {
        SortedSet<Integer> myList = new TreeSet<Integer>();
        myList.add(3);
        myList.add(1);
        myList.add(6);

        System.out.println(myList);
        //prints [1, 3, 6]
    }
}
Notice how the elements are sorted in their natural ascending order. For a deeper dive on the added functionality provided by SortedSet and SortedMap, check out this as well as the official documentation.
Algorithms
The Collections class provides a number of static methods used throughout the Java platform.
Examples of algorithms that come from the Collections Class
import java.util.*;
public class MainClass {
    public static void main(String[] args) {
        List<Integer> myList = new ArrayList<Integer>();
        myList.add(3);
        myList.add(1);
        myList.add(6);

        Collections.reverse(myList);
        System.out.println(myList);
        //prints [6,1,3]

        Collections.shuffle(myList);
        System.out.println(myList);
        //prints [1,6,3]
    }
}
While the reverse() method reverses the order of the collection, the shuffle() method randomly changes the order of the collection.
The majority of such methods operate on List implementations, however some apply to all Collection instances. For more on working with these algorithms, check out the original documentation.
Conclusion
The Collections framework is a cornerstone of the Java programming language. In this tutorial, you saw how the Collections framework represents a hierarchy of core collection interfaces.
These interfaces both inherit common functionality (like for-each) from the Collection interface and add their own. This makes them more appropriate for certain use cases. We saw how the List interface adds positional access to a collection and how the Set interface puts restrictions on duplicate elements. We saw how the Queue interface gives a FIFO order to elements and how the Map interface lets you represent elements as key/value pairs.
We also saw how the Collections class provides algorithms used throughout the Java language via static methods like shuffle() and reverse().